A dull blade is unpredictable, inefficient, and hazardous. Whether you are prepping proteins in a high-volume kitchen, field-dressing big game in the backcountry, or cutting abrasive fibrous materials on a job site, an inconsistent edge compromises safety. When a knife loses its apex, you naturally compensate with brute downward force. That uncontrolled force leads to slipped cuts, damaged materials, and severe lacerations.
Yet for knife collectors and edge purists, traditional sharpening systems present clear trade-offs:
- Manual Japanese Waterstones: They offer unmatched tactile feedback and artistic control, but human biomechanics make maintaining a strict, sub-degree bevel across an entire curving belly nearly impossible without micro-wobble.
- Pull-Through Carbide Cutters: They promise convenience, but aggressively shear away metal, leaving ragged serrations and ruined profiles.
- Standard Single-Arm Guided Rigs: They lock in angles, but require unclamping or flipping the knife repeatedly, introducing micro-variations from side to side.
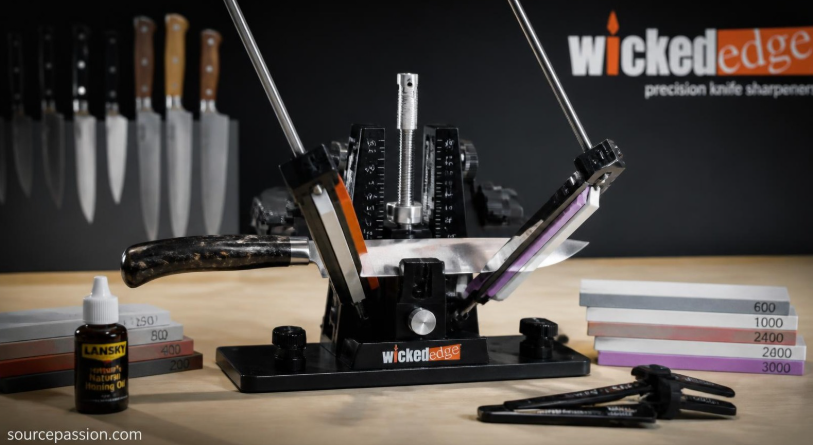
The Wicked Edge Precision Sharpener (WEPS) solves these problems through mechanical engineering. By clamping the blade vertically and utilizing dual-sided, simultaneous sharpening arms anchored to spherical ball joints, it removes human error from the sharpening stroke.
Operating a precision-engineered guided-rod system requires an understanding of blade alignment, clamp physics, stone progressions, and stroke mechanics. Misaligning a knife by a fraction of an inch or over-tightening the vise can distort your bevels or damage blade coatings.
This guide provides an exhaustive breakdown of the Wicked Edge system: analyzing its clamping mechanics, detailing step-by-step sharpening workflows, evaluating micro-adjustments, reviewing real-world performance across modern super-steels, and delivering an honest assessment of its strengths and weaknesses.
What Makes Wicked Edge Different? The Mechanics of Simultaneous Sharpening

Most guided-rod sharpening systems (such as the Lansky, TSPROF, or Work Sharp Precision Adjust) rely on a single guide rod. The user sharpens one side of the blade, unclamps or flips the knife 180 degrees, and sharpens the other.
Wicked Edge uses a dual-arm, simultaneous sharpening architecture. The knife remains stationary in a vertical vise, while two independent, angle-calibrated guide rods work both sides of the edge at the same time.
The Three Structural Advantages
- Zero Angle Variance Between Sides: In systems where the blade flips, mechanical play in the rotating axle can introduce a 0.5° to 1.5° variance between the left and right bevels. Wicked Edge holds the blade completely rigid in a single position, ensuring the apex remains centered along the spine.
- True Symmetrical Burr Control: Working both sides of the blade in alternating passes eliminates the heavy, bent wire burrs created by one-sided grinding. Alternating passes refine the apex progressively, making the final deburring process faster and cleaner.
- Spherical Rod Ball Joints: The guide rods slide smoothly through sealed, low-friction spherical ball joints mounted to an angle-calibration bar. This ensures that whether your hand moves up, down, or diagonally, the stone stays on a fixed flat plane across the blade’s primary bevel.
Wicked Edge Model Lineup: Generational Differences

Wicked Edge offers multiple models designed for different budgets and use cases, from portable setups to high-precision commercial rigs:
The Clamping Evolution: Dual-Screw vs. Gen 3 Cam-Lock
- The Traditional Dual-Screw Vise (WE100/WE120): Uses a bottom depth-alignment screw and a top clamping screw. It requires two Allen keys to secure a blade. While rock-solid, finding the right tension for fully-flat ground blades requires careful adjustment to prevent the knife from canting.
- The Patented Cam-Lock Vise (Gen 3 Pro): A major mechanical upgrade. Moving a single tension lever clamps the jaws down with self-centering tension, automatically adjusting for distal tapers and flat grinds from 1/16-inch up to 3/16-inch thick. This cuts clamping and setup time to under five seconds.
Clamping Physics: How to Prevent Canting and Deflection

The most critical factor in achieving a symmetrical, hair-shaving edge on a Wicked Edge is clamp placement. If the knife is clamped off-center or flexes under stone pressure, your bevel will look uneven from heel to tip.
The Three Golden Rules of Clamping:
1. The Depth Key Alignment
Every Wicked Edge kit includes an acrylic or aluminum Depth-Setting Key featuring two positioning pins.
- Top Holes: For wide blades (such as 8-inch chef’s knives, santokus, and large hunting drop-points).
- Bottom Holes: For narrow blades (such as paring knives, EDC gent folders, and thin fillet blades).
- The spine of the blade must rest flat across both pins of the depth key before the clamp screws are tightened. This guarantees the blade sits parallel to the sharpener’s base.
2. The Clamp Position Ruler
Use the provided alignment ruler to record the horizontal positioning of the blade. Note the exact notch where the knife tip rests (e.g., “Position B.5”).
- Why this matters: When you return to touch up the knife three months later, placing it at the exact same depth and horizontal position ensures your stones hit the existing bevel at the same angle, eliminating the need to reprofile.
3. Managing Distal Tapers and Fully-Flat Grinds
Knives that taper continuously from the spine down to the edge (fully-flat ground blades like the Spyderco Paramilitary 2) can cause standard parallel clamp jaws to grip unevenly.
- The Fix: Apply a strip of blue painter’s tape to the blade flats where the jaws make contact. The tape compresses slightly under pressure, compensating for the taper and locking the knife rigidly in place without marring the finish.
The Angle Calculation Matrix: Slicing vs. Hard-Use

Setting the correct angle is crucial for balancing cutting performance and edge durability. Match your knife steel and tasks to these recommended profiles:
5. Step-by-Step Instructions: The Complete Sharpening Workflow

Follow this structured, step-by-step process to transform dull knives into hair-whittling cutting tools.
Step 1: Clamp and Index the Knife
- Clean the knife blade thoroughly with isopropyl alcohol to remove tape residue and grease.
- Insert the depth-setting key into the clamp holes (use top holes for broad blades, bottom holes for narrow ones).
- Rest the spine of the knife flat across the depth key pins.
- Position the clamp horizontally along the blade’s center of mass.
- Tighten the clamp until the blade is held firmly with zero flex.
- Remove the depth key. Note your horizontal position on the ruler and vertical depth in your sharpening log.
Step 2: The Permanent Marker Diagnostic
- Color the entire primary cutting bevel on both sides of the knife with a black Sharpie marker.
- Set your guide rods to your intended angle (e.g., 20° per side).
- Mount your fine diamond stone (600 or 1000 grit) onto the guide rods.
- Take two light, sweeping test passes across the bevel on each side.
- Inspect the ink under direct light:
- Ink removed only at the top shoulder: Your angle is too acute; raise the angle setting.
- Ink removed only at the very edge: Your angle is too obtuse; lower the angle setting.
- Ink removed completely across the bevel: Your angle matches the knife’s factory geometry.
Step 3: Setting the Apex (Coarse Diamond 100/200 Grit)
Use your coarse diamond stones only if you are resetting a bevel angle, fixing chips, or sharpening a completely blunt edge.
- Slide the 100-grit diamond stones onto the guide rods.
- Hold the handles lightly with your fingers. Do not apply heavy inward pressure. Monocrystalline diamonds cut under light force; pushing too hard can strip diamond particles from the plates and flex the blade.
- The Stroke: Move the stones in an alternating heel-to-tip scrubbing motion, sweeping forward and upward along the edge profile.
- Maintain a 45-degree stone orientation relative to the blade spine as you sweep across the belly toward the tip.
- Work until you feel a continuous, rough wire ridge—the burr—along the entire cutting edge on both sides.
- Switch to the 200-grit side of the stones. Make 20 light passes per side to refine the deep 100-grit scratches.
Step 4: Progressing Through the Grits (400, 600, 800, 1000)
Once the apex is established, your remaining steps focus on refining the scratch pattern:
- 400 / 600 Diamond Hones: Cleans up coarse grinding marks and establishes a sharp, functional working edge. Perform 20 to 30 alternating passes per side.
- 800 / 1000 Diamond Hones: Refines the bevel, reducing the wire burr to a microscopic edge. Use a sweeping, edge-leading motion with light pressure (roughly 1 pound of force).
Step 5: High-Polish Micro-Finishing (Ceramic & Diamond Emulsions)
For a mirror-polished edge, continue through optional ultra-fine accessories:
- 1500 / 2200 Diamond or Hard Ceramics: Polishes the bevel, smoothing out micro-scratches and increasing push-cutting keenness.
- Leather or Kangaroo Strops with Diamond Paste: Apply a small amount of 4-micron, 1-micron, or 0.5-micron polycrystalline diamond paste to the leather strops.
- The Stropping Rule: Make edge-trailing passes only (pulling the stone down and away from the edge). Pushing into the leather will slice into the strop.
Real Cutting Tests: Performance Across Modern Steels

To measure real-world performance, we tested the Wicked Edge Generation 3 Pro across three diverse knife models. Sharpness was tracked using a certified BESS (Brubacher Edge Sharpness Scale) sensor. Lower BESS scores indicate a sharper, keener edge:
- 50–100 BESS: Razor blade / Scalpel keenness.
- 100–150 BESS: High-end Japanese cutlery / Hair-shaving edge.
- 150–200 BESS: Premium factory Western cutlery.
- 250–350 BESS: Usable working edge (starting to feel sluggish on soft produce).
- 400+ BESS: Dull edge (slips off tomato skin, crushes herbs).
Test 1: Spyderco Military 2 (CPM-S90V Super-Steel, 61 HRC)
- Starting State: 410 BESS (Dull; tore through paper and caught on cardboard).
- Sharpening Protocol: 200, 400, 600, 800, 1000 diamond stones, followed by 1-micron diamond-loaded strops at 17° per side.
- Final BESS Score: 85 BESS (Surgical scalpel sharpness).
- Cutting Performance: The monocrystalline diamond plates cut through the hard vanadium carbides without dishing. Push-cut cleanly through free-hanging cigarette rolling paper and shaved arm hair on contact.
Test 2: Chris Reeve Sebenza 31 (CPM-MagnaCut, 63 HRC)
- Starting State: 335 BESS (Lost initial factory edge).
- Sharpening Protocol: 400, 600, 1000 diamond stones at 19.5° per side.
- Final BESS Score: 98 BESS.
- Cutting Performance: Sliced through 20 lb bond paper with zero sound. Glided through heavy double-wall corrugated cardboard without tearing the outer paper liner.
Test 3: Kershaw Iridium (14C28N Sandvik Steel, 59 HRC)
- Starting State: 380 BESS (Sluggish, torn paper fibers).
- Sharpening Protocol: 600 and 1000 diamond stones at 20° per side (bypassed coarse stages).
- Final BESS Score: 110 BESS.
- Cutting Performance: Restored a clean, hair-popping edge in under eight minutes total.
Comprehensive Pros and Cons

8. Real User Reviews: Feedback from Long-Term Owners

Analyzing long-term user feedback across cutlery forums, machining communities, and verified buyer reviews reveals clear consensus patterns:
What Owners Praise
- Repeatable Factory Edges: Users praise the alignment logging system. Being able to record the exact depth and horizontal position means returning to touch up an edge takes just two or three minutes on fine stones, without needing to reprofile.
- Tackling Super-Steels: Owners of modern high-vanadium super-steels (like S90V, Maxamet, and Rex 45) highlight how easily the diamond stones cut alloys that glaze conventional waterstones.
- Bevel Symmetry: Collectors appreciate the clean, mirror-polished, symmetrical bevels the system produces along the entire length of the blade.
Common Frustrations and Practical Fixes
- Blade Canting on Flat Grinds: A common complaint among new users is that thin, flat-ground blades can tilt slightly off vertical in the standard clamp jaws.
- The Fix: Place a strip of blue painter’s tape or thin deerskin leather on the blade flats before tightening the jaws.
- Sticker Shock on Accessories: High-grit diamond stones, strops, and micro-fine pastes are sold as separate accessories, which can add up quickly.
- The Fix: Master the core 100–1000 grit diamond stone set first. A 1000-grit diamond edge delivers more than enough cutting performance for 95% of daily tasks.
- The Break-In Period: New users often note that brand-new diamond stones leave visible scratches. Like all diamond plates, they require an initial break-in period of 5 to 10 knives to shed loose surface crystals before delivering their true micron finish.
Wicked Edge vs. Competing Guided Systems

| Performance Feature | Wicked Edge (Gen 3 Pro) | TSPROF Kadet Pro | Work Sharp Precision Adjust | Edge Pro Apex 4 |
|---|---|---|---|---|
| Sharpening Arms | Dual Simultaneous Arms | Single Guided Arm | Single Guided Arm | Single Manual Guide |
| Blade Holding | Vertical Cam-Lock Vise | Horizontal Rotary Clamp | Horizontal Rotary Chuck | Flat Resting Table (Handheld) |
| Angle Range | 10° to 35° Continuous | 9° to 28.5° Continuous | 15° to 30° Continuous | 13° to 25° Marked Guide |
| Angle Adjustment | Single Micro-Drive Dial | Rack & Pinion Tower | Threaded Lead-Screw | Manual Stop Rings |
| Diamond Compatibility | 100% Monocrystalline Sets | Full 6-Inch Stone Holder | Tri-Brasive Cartridges | Optional Diamond Plates |
| Speed (Dull to Sharp) | 5 to 10 Minutes | 15 to 20 Minutes | 15 to 25 Minutes | 15 to 25 Minutes |
| Approximate Cost | $700 – $1,000+ | $350 – $550 | $60 – $120 | $220 – $320 |
You can buy them on AMAZON right now
Cleaning, Maintenance, and Hardware Care

To maintain tight mechanical tolerances over years of use, follow these basic maintenance routines:
- De-Clogging Diamond Plates: When diamond plates darken with metal filings (swarf), their cut rate slows. Wash the stones under warm water with mild dish soap and scrub with a stiff nylon toothbrush. Let them dry completely before storing.
- Caring for the Ball Joints: Clean the spherical pivot joints with a dry microfiber cloth to remove stray metal filings. Apply a single drop of light synthetic machine oil (like Nano-Oil or sewing machine oil) to each joint once a month for smooth gliding action.
- Caring for the Clamp Jaws: Wipe the inside faces of the clamp jaws with alcohol after every session. Loose metal dust left inside the jaws can grind into the blade flats of your next knife.
- Frequently Asked Questions
Can the Wicked Edge sharpen curved recurve or hawkbill blades?
Standard flat Wicked Edge stones cannot sharpen concave edges (such as karambits or recurve blades), as flat stones will only contact the outer edges of the curve. To sharpen recurves, Wicked Edge manufactures specialized Curved Diamond Stones with rounded abrasive surfaces designed to follow concave profiles.
Will the clamp scratch my knife’s blade flats?
If bare metal clamp jaws contact a dirty blade, trapped metal dust can leave light cosmetic surface marks on satin or DLC finishes. To prevent scratches, wipe the blade clean and place a single layer of low-tack blue painter’s tape over the blade flats before clamping.
Do I need to buy the expensive granite base?
No. The granite base provides heavy, free-standing stability on countertops, but Wicked Edge also offers lighter aluminum mounting plates or C-clamps that anchor the sharpener directly to a workbench or table.
How many knives can I sharpen before the diamond stones wear out?
Under normal home and collector use, Wicked Edge monocrystalline diamond stones typically last for hundreds of knives (often 5 to 10+ years of regular service). The most common cause of premature wear is using heavy downward pressure, which can strip diamond particles from the nickel plating. Let the weight of the stone do the cutting.
How do I sharpen a long 10-inch chef’s knife without angle variance?
Because the guide rods pivot from fixed points, the distance from the pivot to the edge increases at the tip and heel of a long blade, introducing slight angle variation. For long kitchen blades, position the clamp roughly one-third of the way forward from the heel to balance the span, or unclamp and move the knife along the blade to sharpen it in two overlapping sections.
Key Takeaways
- Dual-Arm Efficiency: Simultaneous two-sided sharpening cuts working time in half and eliminates the angle variations common to flipping clamps.
- Keep Angles Consistent: Consistency matters more than the exact degree. Record your depth and horizontal ruler settings so future touch-ups take only two or three minutes.
- Light Pressure is Mandatory: Monocrystalline diamonds cut under light force. Pressing hard flexes the blade and strips diamond crystals from the plates.
- Use the Sharpie Trick: Marking the bevel with a permanent marker confirms that your stones are contacting the entire bevel from shoulder to apex.
- Master the Core Grits First: A progression from 100 to 1000 diamond grit delivers hair-shaving edges for almost every task; reserve ultra-fine ceramics and strops for mirror-polishing.